


Introduction
In this article, we will show how you can use open-source MediaCMS software to build a video portal in a few minutes that will allow users to upload their videos, categorize and tag them and make them available for streaming.
Why self-host
There are many reasons where self-hosting our content is preferable over utilizing one of the commercial solutions:
- We want to maintain full control of what is getting uploaded.
- We want to serve ads-free content to our users, and avoid unneeded distractions, for example, a plethora of totally unrelated (but interesting!) content.
- We care about privacy and don’t want our users to get tracked by a number of external services while browsing the content, for advertising purposes.
- We don’t want the content to leave the company/organization —for example, a company might have training material for new employees that they do not want to leave their own infrastructure and not be uploaded to the internet.
- Low internet connectivity, or no internet at all, this is the case for a number of rural areas, where serving content from a local network will be preferred.
Let’s make a video portal
We will make a video portal to upload videos from our 2021 holidays. The portal will be public, served under its own domain, under HTTPS.
If you don’t have a valid domain name you can still follow up the instructions and skip any part that specifies working with the domain name. MediaCMS will utilize any IP address it finds on the server.
We encourage users to upload content, so the workflow will be that
- users self-register their accounts
- users upload their videos, then optionally assign tags to them, curate titles/descriptions, and set categories
- users may comment on other users videos or organize them through playlists
- users may add interactions such as like/dislike
- portal manager(s) get notified of incoming videos
Videos will get transformed to web-friendly formats (a procedure called transcoding) and will be available for streaming, but also to download.
Content is served as mp4 video files, but also through HLS adaptive streaming, a technology where the browser negotiates what resolutions to request from the server in order to stream to the user, based on its network bandwidth at the time, so the experience is optimized for the end-user.
Throughout the article, we are going to use the domain https://holidays.mediacms.io as our demo video portal URL.
Step 1: create a server
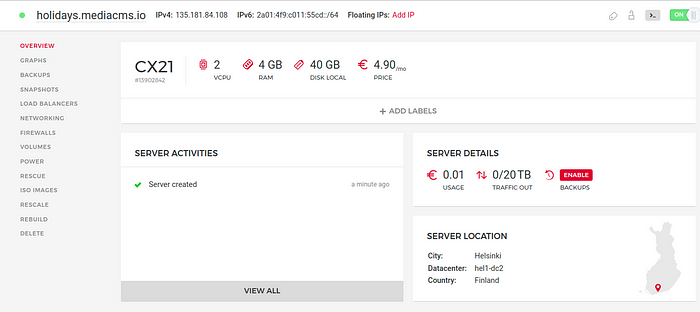
We need a server to host our portal, and we suggest that we use an Ubuntu 20 server, so create this on any cloud provider — in our case, this will be Hetzner. Very low specs as 2 vcpu / 4G RAM is ok for our small portal, just keep in mind that the server need have at least three times the disk space of video content that is planned to be uploaded — if 10GB of video is going to be uploaded, we need a disk of at least 30GB as original videos get stored, plus encoded versions.
Step 2: setup DNS (optional)
We will map the ip address of the newly created server to the domain name of our choice — holidays.mediacms.io in this case. This is an optional step — by default the installation will make MediaCMS available to all ips found on the server, but if we want to be able to utilize a valid domain name, and get a valid SSL certificate, we have to create a record to the domain name registrar of our domain.

So our domain holidays.mediacms.io will point to the ip address of the server —We are using Namecheap in this case
Step 3: MediaCMS installation
There are two ways to install MediaCMS, using a one-liner installation script that will install it on a single server, or using Docker.
Both ways are documented in the Administrators section of the documentation. We are going to show both ways here.
First, connect to the server through ssh
user@user:~$ ssh root@holidays.mediacms.io
root@holidays:~#
Update the system — since it might be missing basic commands as git
apt-get update; apt-get upgrade -y ; apt-get install git -y
Installation method A: Single Server
Run the following command, it will create a directory for MediaCMS, clone the project from Github and execute the one-liner script
mkdir /home/mediacms.io && cd /home/mediacms.io/ && git clone https://github.com/mediacms-io/mediacms && cd /home/mediacms.io/mediacms/ && bash ./install.sh
We get the following message that informs us that some services are going to be installed.
Welcome to the MediacMS installation!This script will attempt to perform a system update, install required dependencies, install and configure PostgreSQL, NGINX, Redis and a few other utilities.
It is expected to run on a new system **with no running instances of any these services**. Make sure you check the script before you continue. Then enter yes or no
Enter yes
yes
OK!
Performing system update and dependency installation, this will take a few minutes
After 1–2 minutes we get the following message:
Enter portal URL, or press enter for localhost :
we can press enter, and this will install MediaCMS and make it available on all ips of the server, plus give it a default portal title. But remember, if we are going to use our own DNS name, and get a valid SSL certificate automatically produced for us, we will need to specify the URL of our portal, plus a custom title optionally.
Enter portal URL, or press enter for localhost : holidays.mediacms.io
Enter portal name, or press enter for 'MediaCMS : 2021 Holidays
After a few more minutes the installation completes, and the last message we see is
MediaCMS installation completed, open browser on http://holidays.mediacms.io and login with user admin and password 8io4l0qkvy
Congratulations, we have a working MediaCMS installation! Keep note of the admin password auto-generated for us, and move to the following section — of course, skip the Docker Compose installation method.
Installation method B: Docker Compose
Install a recent version of Docker and Docker Compose
curl -fsSL https://get.docker.com -o get-docker.sh && sudo sh get-docker.sh && sudo curl -L "https://github.com/docker/compose/releases/download/1.29.2/docker-compose-$(uname -s)-$(uname -m)" -o /usr/local/bin/docker-compose && sudo chmod +x /usr/local/bin/docker-compose
Now it’s time to get MediaCMS — we’ll get it from Github and the official repository
git clone https://github.com/mediacms-io/mediacms && cd mediacms
We can just type
docker-compose up
now and this will install MediaCMS and make it available to all ip addresses of the server — however this will be accessible only through HTTP. If we want to get a valid SSL certificate through Let’s Encrypt and serve our portal through HTTPS, we edit the file docker-compose-letsencrypt.yaml and replace the following three lines
VIRTUAL_HOST: 'mediacms.52.209.5.113.nip.io'
LETSENCRYPT_HOST: 'mediacms.52.209.5.113.nip.io'
LETSENCRYPT_EMAIL: 'email@example.com'with
With ones that reflect our URL, and email address (this is used by Let’s Encrypt to send us warning emails that the URL needs certificate update)
VIRTUAL_HOST: 'holidays.mediacms.io'
LETSENCRYPT_HOST: 'holidays.mediacms.io'
LETSENCRYPT_EMAIL: 'info@mediacms.io'
Apparently, you will have to use your domain and email address here, and be sure that the URL resolves to this server, otherwise Let’s Encrypt won’t be able to validate that the URL maps the ip address of our server and thus won’t produce a valid certificate.
Last step, edit deploy/docker/local_settings.py and replace
FRONTEND_HOST = 'http://localhost'
with your URL
FRONTEND_HOST = 'https://holidays.mediacms.io'
Time to run docker-compose now
docker-compose -f docker-compose-letsencrypt.yaml up
In a few minutes, all processes have been completed and one of the last messages we see on our screen is something like this:
migrations_1 | Created admin user with password: jevfm7huqb
This is the admin password, don’t forget to note it — we can change it later.
Visit the portal
Let’s visit https://holidays.mediacms.io and see what we have here
Fantastic news! We have completed the installation, and visit the new portal under a valid SSL certificate (created automatically for us, by Let’s Encrypt)
Tip: if you’ve followed the Docker installation, type control+C to stop the docker-compose command from running on the foreground, and run
root@holidays:~/mediacms# docker-compose -f docker-compose-letsencrypt.yaml up -d
so that Docker Compose runs in the background.
Basic portal setup
Before we give the URL to our users, let’s perform a basic task, add some custom categories. By default, MediaCMS installs a few categories for us, but we want to use our own — in this case, we’ll start with ‘mountain’ and ‘sea’. Logged in as admins, we visit the categories section
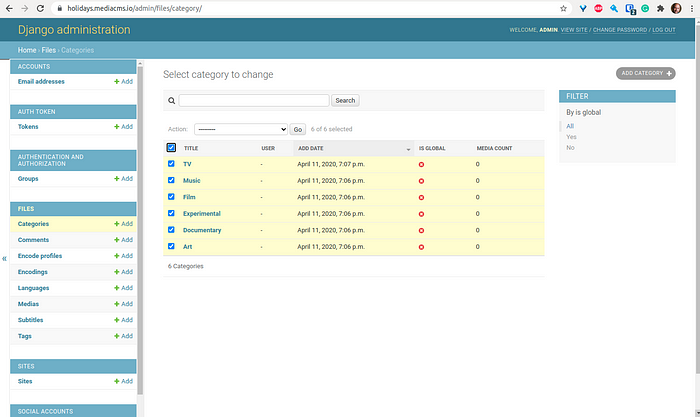
delete existing categories and add the new ones by hitting ‘Add category’ and only giving the title of our choice.
Upload of video content
Time to upload some content, all we need is to pass the URL to our users so they can self-register their accounts and start uploading content. All content gets uploaded through the upload form (find the link top right, once logged in) and the progress of uploading can be seen. You may also choose to upload many files at once.
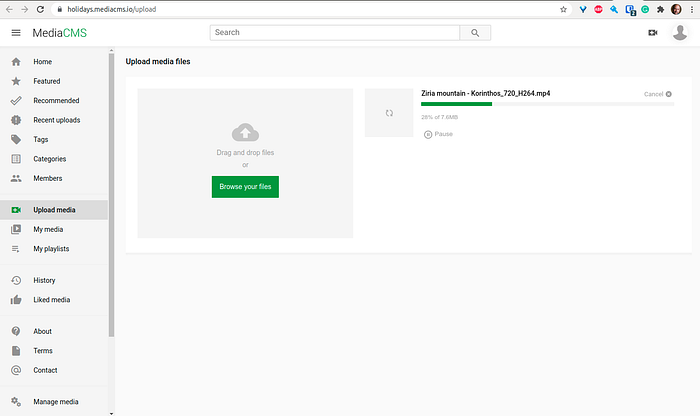
Users can upload videos but other media files as well — images, audio, and pdf. They are all available for download and appear on the search, index page, and user media listings.
Videos will appear on any listings page as soon as they get transcoded successfully, this might take some time for bigger video files, especially if our server specs are very low, but the rule is that very light versions (240px height resolutions) get transcoded first so that videos appear on the listings as soon as possible, and then the system takes the time to transcode bigger and more demanding resolutions.
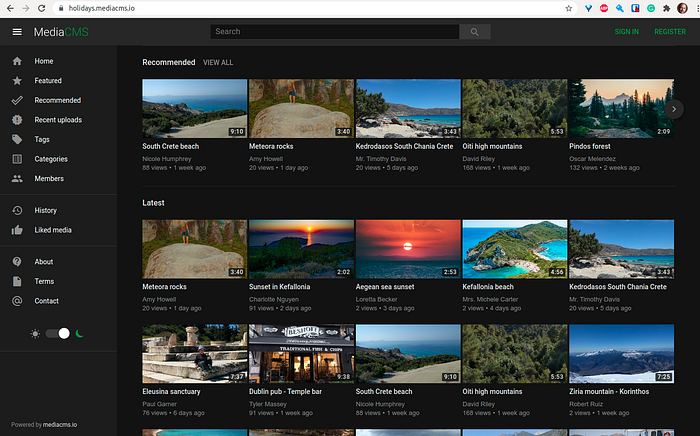
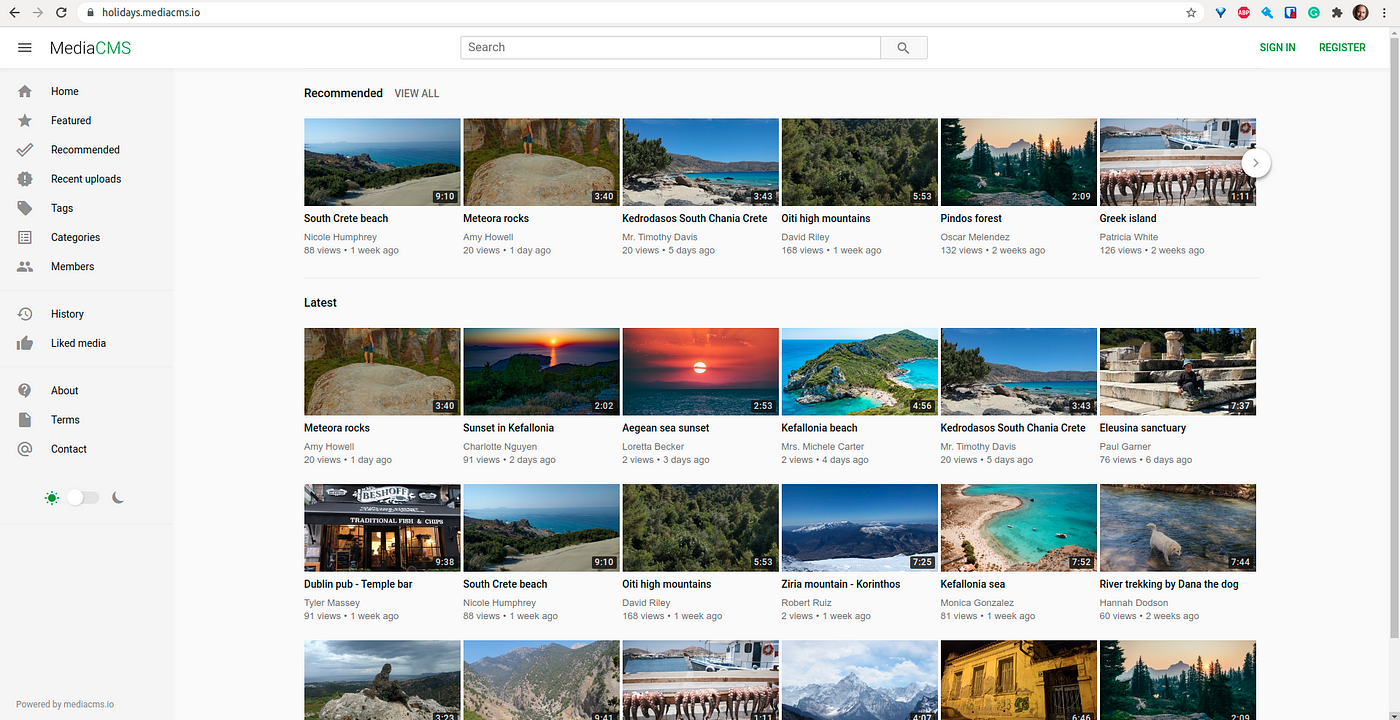
So after giving the URL and adding some media, this is how our portal looks like
Editing Media
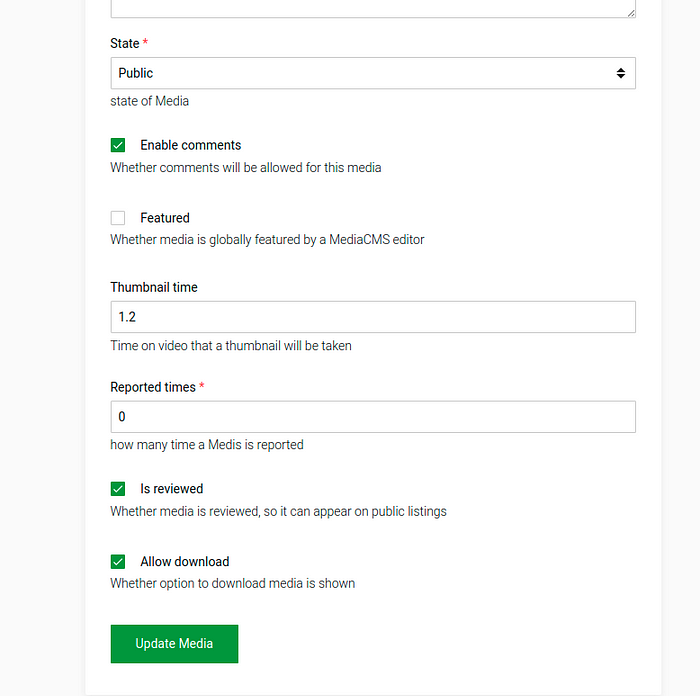
Users may select their media, once uploaded to the system, and curate title and description, add tags and categories, and optionally add a poster image that will appear on listings
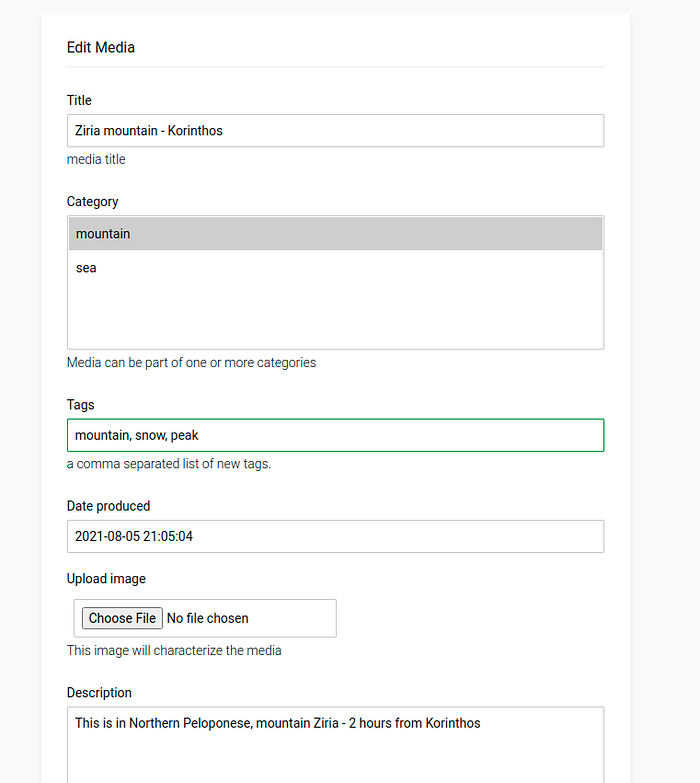
There are also more advanced options, such as whether the ‘download’ link will appear on the video page, whether comments are allowed, and more.
MediaCMS allows the creation of special groups of users as Managers and Editors (you can read about this below) that may also edit user’s media and set the state of the media to unlisted or private, or make it globally featured so that it always appears on the front page of the portal.
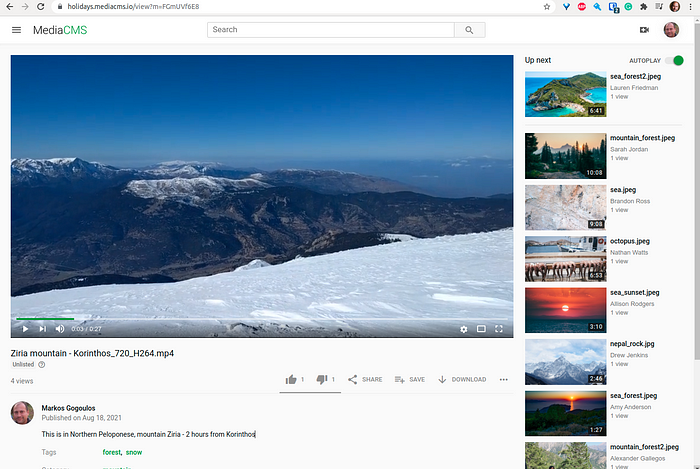
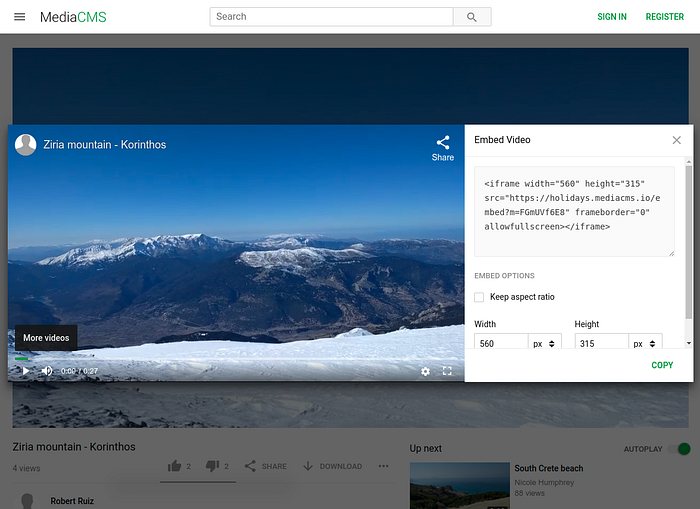
Viewing and sharing media
Clicking on a video will open it on a separate page and we can view it.
We can also use the sharing options (under SHARE) to share or even embed to another page by copying the embed code produced for us.
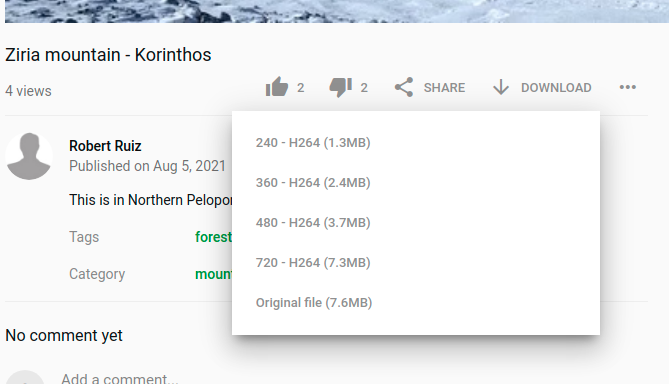
Encoded versions, along with the original video are available for download, under the DOWNLOAD option.
Further portal modifications
When new video and media content gets uploaded to MediaCMS and the encoding process finishes successfully, it appears on all listings, including the index page, the users page, and appears as results on search too. So the workflow is this:
- User uploads a video file
- Video file gets encoded successfully
- Video appears on all listings
While this is ok for many cases, it’s also one of the very first things to consider when making a portal open to the internet. We can replace this behavior and allow for the following workflow:
- User uploads a video file
- Video file gets encoded successfully
- Video does not appear on any listing, you may see it only if you have it’s URL
- A MediaCMS Manager or Editor has to change its state to public, and in this case, it will appear on all listings. Otherwise not. Users cannot change the status themselves.
In order to achieve this, set
PORTAL_WORKFLOW = 'unlisted'
To cms/local_settings.py, if you have followed the single server installation, and restart the related services for the setting to take effect
root@holidays:~# systemctl restart mediacms celery_long celery_short
If you have used the Docker installation, make the change to file deploy/docker/local_settings.py and restart the related containers
root@holidays:~/mediacms# docker-compose -f docker-compose-letsencrypt.yaml restart web celery_worker
Other modifications might include:
- setting up the email options so that you get notifications under a number of events (eg new media uploads, new comments)
- adding a custom logo for your portal
- setting whether users may self-register, whether they have to confirm their email accounts, or whether the portal will be invite-only
This and many other settings can be found on the documentation available for administrators.
Advanced roles and media management
MediaCMS supports the following user roles:
- anonymous user (a user that hasn’t signed in)
- authenticated users (simple users, may upload content, add comments, create playlists, etc)
- administrator (superuser, has read/write access to all content)
- Editor (can edit and delete any user’s media, has access to management pages)
- Manager (what an Editor can do, plus the ability to edit and delete users)
As an administrator, you can browse to a user’s profile, edit, and mark them as Editors/Managers.
—
Source of article: https://medium.com